Learning how to apply eyelash clusters is one of the best investments you can make in your makeup skill set, especially if you want the look of fuller, longer lashes without the commitment of a full strip or lash extensions. Clusters give you flexibility, a more customizable finish, and a result that can look remarkably close to your natural lashes when applied correctly.
This guide covers everything you need to know, including:
- What clusters are and how they differ from strip lashes
- How to choose the right style for your eye shape
- Tools that make application easier
- A step-by-step placement process for a natural finish
- How to blend, maintain, and remove clusters without damage
- The most common mistakes and how to avoid them
By the end, you will have a clear, repeatable process for applying eyelash clusters that look like they belong there.
What Are Eyelash Clusters and How Are They Different from Strip Lashes?
Eyelash clusters are small bundles of lash fibers attached to a tiny, flexible base. Instead of applying one continuous strip across your entire lash line, you apply several individual clusters at different points along the eye. This gives you much more control over where you add volume and length.
Strip lashes cover the full lash line in one piece, which means you are committing to a specific shape and density the moment you place them. Clusters let you build the look section by section, so you can add more at the outer corner for a cat-eye effect, focus volume in the center for a doll-eye look, or keep things minimal with just two or three clusters for a barely-there enhancement.
For beginners, clusters tend to be more forgiving. A slightly imperfect placement is far less noticeable than a misaligned strip lash. And because you are working in small sections, any mistakes are easy to adjust before the glue fully sets.
Choosing the Right Eyelash Clusters for a Natural Look
The cluster style you choose makes a significant difference in how natural the final result looks. Here is what to pay attention to when shopping:
- Size: Clusters come in micro, small, medium, and mixed-length options. For a natural look, micro and small clusters are your best friends. Larger, fuller clusters work well for dramatic looks but can appear heavy if overused.
- Fiber type: Mink-style or silk fibers tend to look softer and more natural than synthetic options. They catch light more subtly and blend more easily with real lashes.
- Curl: Choose a curl that matches your natural lashes or the curl you get from a lash curler. A mismatch in curl pattern is one of the quickest ways for clusters to look obviously fake.
- Length: Stay within a few millimeters of your natural lash length for the most seamless result. Going dramatically longer draws more attention to the fact that they are not real.
When in doubt, start with a mixed-length kit. These come with a variety of sizes that give your lash line a natural variation in length, which is exactly what real lashes have.
Tools You Need to Apply Eyelash Clusters
Having the right tools nearby makes a noticeable difference in your results, especially when you are still learning the process.
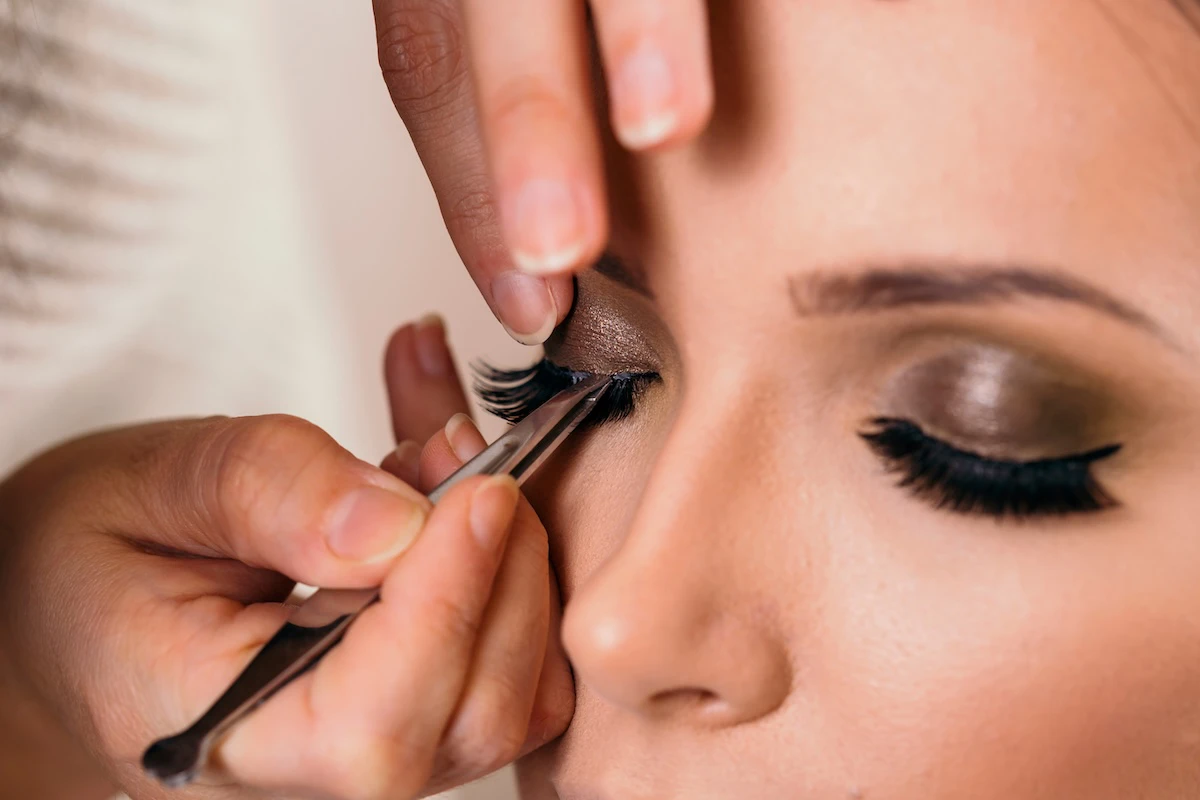
- Tweezers or a cluster lash applicator: These give you the precision to place small clusters exactly where you want them without disturbing adjacent ones.
- Lash glue or a bond-and-seal system: Traditional lash glue works well for same-day wear. Bond-and-seal systems (where a bond is applied to the lash base and a seal locks it in place) are designed for multi-day wear and tend to hold more securely.
- A mirror at eye level: Looking down into a mirror on a table causes you to see a distorted view of your lash line. A mirror at eye level or a lighted makeup mirror gives you the most accurate view.
- Mascara: Applied before and after clusters, mascara helps blend everything together.
- Thin eyeliner: For concealing any visible adhesive dots after placement.
If you are choosing between traditional glue and a bond-and-seal system, beginners often find bond-and-seal easier to work with because the bond dries more slowly, giving you more time to adjust placement before it sets.
How to Prep Your Eyes Before Applying Eyelash Clusters
Prep makes a bigger difference than most people expect. Starting with the right base improves adhesion, speeds up the blending process, and makes clusters look immediately more integrated with your natural lashes.
Here is how to prep:
- Curl your natural lashes. This ensures your real lashes and the clusters share the same curve. Uncurled natural lashes under curled clusters create a visible gap that breaks the illusion.
- Apply one thin coat of mascara. This gives your natural lashes more texture and bulk for clusters to grip onto. It also darkens the lash line so any tiny gaps between clusters are less visible.
- Make sure your lids are oil-free. Oil is the enemy of lash adhesion. If you have oily lids, dust a small amount of translucent powder over the lash line before starting.
Skipping these steps does not make application impossible, but it does make blending harder and wear time shorter.
How to Apply Eyelash Clusters Step by Step
This is the core of the process. Read through all the steps before starting so you know what to expect.
- Select your clusters. Lay out the sizes you plan to use before you begin. Having them ready means less fumbling once glue is involved.
- Apply adhesive to the cluster base. If using traditional glue, dip the base of the cluster into a small dot of glue on the back of your hand or a disposable surface. If using a bond-and-seal system, apply the bond directly to the cluster base with the applicator wand.
- Wait for tackiness. For traditional glue, wait 20 to 30 seconds. For bond, it sets more gradually, so you have a little more flexibility. Either way, do not place the cluster while the adhesive is wet.
- Choose your placement method. There are two common approaches:
- On-top method: Place the cluster on top of your natural lashes, as close to the lash line as possible. This is easier for beginners.
- Underlash method: Slide the cluster underneath your natural lashes and press the base against the lash line from below. This creates the most natural look because your real lashes sit on top, but it requires more practice.
- Place clusters starting at the outer corner. Work inward rather than starting at the inner corner. The outer corner is where most people want the most volume and length, and starting there helps you anchor the look before filling in the center.
- Press gently to secure. Hold each cluster in place for a few seconds after placing it to make sure the adhesive bonds properly.
If using the bond-and-seal system, apply the seal over the entire lash line after all clusters are placed. This locks everything in and creates a clean finish along the base.
Where to Place Clusters for the Most Natural Result
Placement strategy is what separates a natural-looking cluster application from one that looks spotted or overdone.
For a natural everyday look:
- Place two to three medium clusters on the outer third of the lash line to add length and a subtle lift
- Add one or two small clusters in the center of the lash line to build volume without overwhelming the eye
- Use micro clusters sparingly at the inner corner, or skip it entirely. The inner corner is a sensitive area, and too much lash there looks heavy and unnatural
Space the clusters slightly unevenly rather than placing them in perfectly measured intervals. Real lashes do not grow in perfect rows, and artificially even spacing is one of the things that makes false lashes look fake.
Step back from the mirror periodically during placement to assess the overall shape. It is much easier to adjust a cluster when you can see the full picture.
How to Blend Eyelash Clusters with Your Natural Lashes
Blending is the finishing step that pulls everything together and makes the difference between clusters that look applied and clusters that look grown.
Once all clusters are placed and the adhesive has dried:
- Apply a second coat of mascara. Work from the roots upward to unify your natural lashes and the cluster fibers into one cohesive layer. Avoid overloading the tips of the clusters, which can weigh them down.
- Press natural lashes and clusters together at the base. Use the tip of your tweezers or your fingertip to gently press everything together at the root. This eliminates any visible gap between your lash line and the cluster base.
- Conceal any adhesive dots. Run a thin line of gel liner or a small amount of dark eyeshadow along the lash line to cover any visible glue. This also makes the lash line look fuller and more defined.
If you can still see individual cluster bases after lining, a gentle smudge of dark eyeshadow pressed along the root with a small brush will soften everything and make the whole lash line read as one.
How Long Do Eyelash Clusters Last?
Wear time depends almost entirely on the adhesive you use.
- Traditional lash glue holds clusters securely for one day of wear, typically 8 to 12 hours. This is the best option if you want to remove them at the end of the night.
- Bond-and-seal systems are designed for multi-day wear, typically 3 to 5 days. Some people wear them up to a week with careful maintenance.
To extend wear regardless of adhesive type:
- Avoid oil-based products anywhere near your eye area, including cleansers and eye creams
- Do not rub or pull at your eye area
- If sleeping in clusters applied with a bond-and-seal system, sleep on your back or use a silk pillowcase to reduce friction
How to Remove Eyelash Clusters Without Damaging Your Natural Lashes
Gentle removal is non-negotiable. Pulling clusters off without dissolving the adhesive first puts direct tension on your natural lashes and can cause breakage over time.
Here is the correct process:
For traditional glue:
- Soak a cotton pad with oil-based makeup remover or micellar water and hold it against your closed eye for 15 to 20 seconds.
- Once the glue has softened, slide each cluster off gently by pushing it sideways rather than pulling outward.
- If a cluster resists, apply more remover and wait. Never force it.
For bond-and-seal systems:
- Use the matching seal remover that comes with the system. Oil-based removers can also work, but the dedicated remover dissolves the bond most effectively.
- Apply the remover along the lash line and allow it to break down the bond before attempting removal.
- Slide clusters off gently, working from the outer corner inward.
After removal, cleanse your lash line thoroughly to remove any residual adhesive before your next application.
Can You Reuse Eyelash Clusters?
Most clusters are designed for single use, and this is especially true for clusters applied with bond-and-seal systems, where the adhesive fully coats the base. Attempting to clean and reuse these usually results in a misshapen cluster that will not adhere properly the second time.
Some higher-quality clusters applied with traditional glue can be reused once if you remove them carefully and peel the dried glue off the base without distorting the fibers. Store them back in their original tray to preserve their shape.
As a general rule, budget cluster kits are best treated as single-use. The cost per application is low enough that reuse is rarely worth the effort, and fresh clusters always look and adhere better than reused ones.
Common Mistakes to Avoid When Applying Eyelash Clusters
Keep this list nearby while you are still building the habit:
- Applying too many clusters and covering the entire lash line edge to edge
- Spacing clusters in perfectly even intervals, which looks unnatural
- Skipping the mascara base coat, which makes blending harder
- Placing large or medium clusters near the inner corner, which looks heavy
- Not waiting for the adhesive to get tacky before placing
- Skipping the blending step so clusters look spotted rather than seamless
- Pulling clusters off without dissolving the adhesive first
Every one of these is a habit, not a flaw. Each time you practice, the process becomes more intuitive and the results improve.
Conclusion
A natural cluster lash look comes down to two things: strategic placement and thorough blending. You do not need to cover every inch of your lash line. A few well-placed clusters at the outer corner and center, blended with a coat of mascara and a clean lash line, can look better than a full row applied without intention.
If you are new to clusters, start small. Apply three clusters to just the outer corner on your first attempt and see how you feel about the result. Build from there as your confidence grows.
For hands-on guidance from a professional, our Makeup and Hair Classes in Columbus, Ohio are a great way to learn techniques like this in real time with personalized feedback.